


Part 3 - Steel Wool
Steel wool works very well for getting the metal to a good polish. What worked best for us was to try to go "with the grain." While the aluminum does not really have a 'grain' to it, try to go in one direction, we usually did it to match how the frame was orientated, like on horizontal parts we did side to side, and on vertical parts, we scrubbed it up and down.
We started with steel wool #1. This is rough steel wool and can give you some metal slivers, a set of gloves is nice for this steel wool. Use this level over every part of the bike, it will remove small marks or swirls that are left. You might have to do this for a while, and you're arm will get sore after a while. You should be able to see some of the marks going away as you go over it will the steel wool #1.
Next we moved on to the steel wool #00. This is considered a finishing steel wool. It will give a very smooth surface which will result in a good shine when we move onto the polish later. Again, you want to go over the whole bike again, covering everywhere you want to be polished. If you see some trouble spots, you might need to go back over them with the #1 steel wool or even the sander again. If this is the case make sure you go back over it again with the #00 when you are satisfied with the results.
Now comes the best steel wool, #0000. This stuff is very fine, and it's hard to tell if it's actually doing anything while you are scrubbing the bike because it does not cause a lot of friction. The more you go over it with this, the better it will end up looking after polishing. Like with the #00, if you see any spots that don't look as good, go over them again with the lower levels of steel wool or sandpaper. Remember to work your way back up again if you do go this route.
Part 4 - Polishing!
Now comes the most rewarding part, as you transform your bikes frame from a ugly looking hunk of bare metal, to a highly polished work of art. A high speed buffer will save you hours, and hours, and hours, of doing this by hand, so get one. For buffing we normally used a speed of 3000rpm.
The polish we used the most was Mothers Aluminum Mag Polish, it is available at any automotive store. Work the polish into the metal using a cloth, or as we preferred, a pad of #0000 steel wool. This way you get a little extra scrubbing in as you apply it. A circular pattern is good to make sure you get it into all the little bumps and crevices. Go in sections, there is no point in covering the whole bike at once, it just wastes time. We split the sections up into: sub frame, swing arm, left rough cast, left main frame, right rough cast, right main frame. You can do it however you like but this worked well for keeping up on track.
Once you get the polish applied to an area, let it sit for a couple minutes. You may see it turn black, this is a good thing, not a bad thing. Now crank up the buffer, and remove the polish. GO SLOWLY, and I do mean slow. going over it quickly will just make you have to go over this even more times. I crept along, going going an eighth of an inch a second. I learned the hard way that this is actually more effective then getting it off as quick as I could. Once you are done buffing that area, use a soft, clean cloth to remove and residue left over.
You're going to want to go over this again, and again, and again.. each time will make it look a little better, I think we went over each spot around 15 times. When you first start it will not look all that great, but as you go over it repeatedly it will get better and better. You can choose to go over it as little or as much as you like, depending on how good of a shine you are looking for.
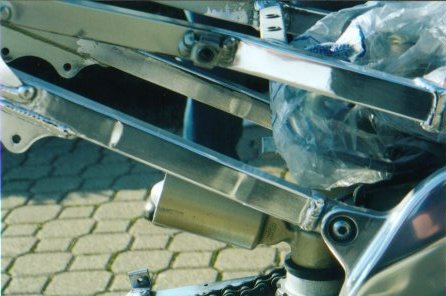
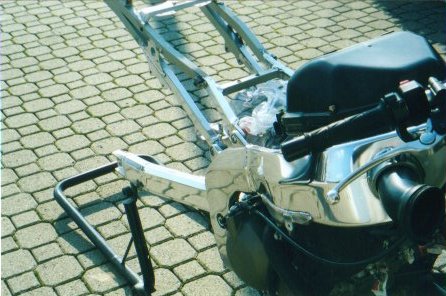
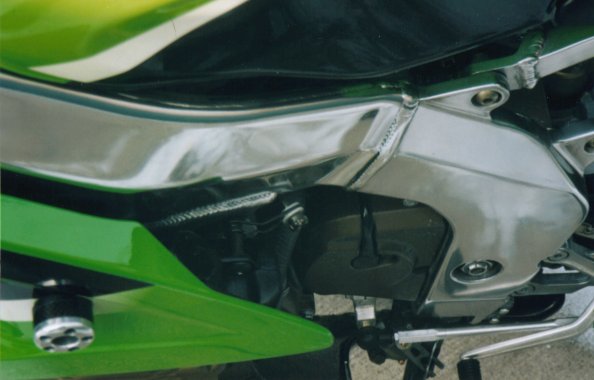
Once we did 15 or so times in each area, we were very happy with the results. We could see ourselves in the reflections, and it looked awesome even without the bike being assembled. Here are a couple pics showing how it looked at this point for us:
As you can see, it turned out quite well. In these pictures the rough cast area was not quite done yet, but it was a lot better then when we started.
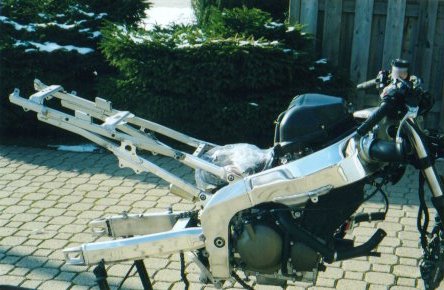
So we thought we were done and assembled one of the two bikes, and began to work on completing the other one (mine actually). When we were near complete on mine, we came across a polish that someone else mentioned was very good. It is called Autosol, and it made the frames look even better. It can be applied just like the Mothers polish above. You don't need to use a lot of this stuff, and it looks awesome even done by hand, let alone with the buffer. Below are some pics of how it looked after the Autosol:


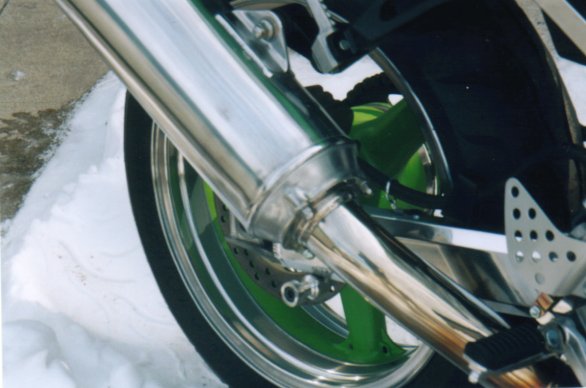
The above are Mike's bike, and the below are my (Lee's) bike. I also polished my wheels, fairing bracket, rear shock canister, and stock exhaust can, while Mike powder coated his wheels black and got a Hindle high mount Titanium system put on.
Now that you have a nice and polished frames, you need to ensure it stays looking good. Polishing the frame means you will need to spend more time on cleaning the bike, and you'll have to break out the polish from time to time too. Some people choose to clear coat their frames, but from what I've heard, this is not a good option. The paint tends to yellow over time, and may have trouble sticking to the frame.
If you put a sealant on it (we used Mothers sealant/glaze, and some stuff Mike got from work (he works at Mercedes) ) and a good wax (again both Mothers Carnauba wax and some stuff from Mercedes) you should not have any problems maintaining the frame.